Both of these come into play when configuring Forms Based Authentication.
Mission
Configure an extranet web application for Claims based authentication using AD and Forms. Store membership credentials in a SQL database. Manage members through IIS Manager.
Game Plan
1. Configure SQL for membership store
- Create database
- Create SQL User
- Add SQL user to database
2. Configure Central Admin to use SQL membership store
3. Configure Secure Store Web Service to use SQL membership store
4. Create new Web Application for extranet site
5. Configure Extranet site to use SQL membership store
So let’s begin…
1. Configure SQL for membership store
The process of creating the store is exactly the same as what we did for 2007, so I’ll just copy and paste that thank you!
The membership store is still created using the ASP.NET SQL Server Setup Wizard. This is launched from the .NET 2.0 Framework folder on the server at:
C:\Windows\Microsoft.NET\Framework\v2.0.50727\aspnet_regsql.exe
This wizard will take you thorough the steps and will build out the SQL database for you.

Once you select to Configure SQL Server for application services, you will be prompted for the SQL Server name and database name. You can choose an existing database to add the membership elements to, or you can type in a new name and the database will be created for you.
Once the database is created, we’re going to create and add a SQL user, rather than use integrated authentication. If your SQL instance is not already running in mixed-mode, you can change it through Server properties in SQL Server Management Studio. Right-click on Server in Object Explorer and select Properties, then navigate to the Security page.
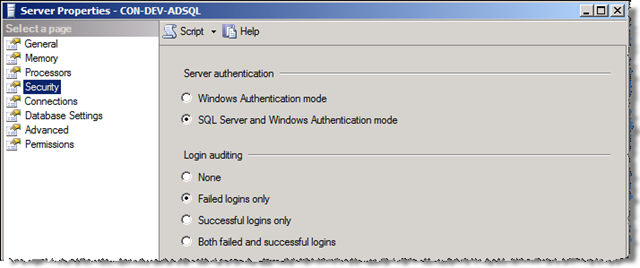
Create SQL user
Back in object Explorer, expand Security –> Logins. Right-click logins and select “New Login…” On the New Login page, enter a username, password on the general page, clear all three password options for policy, expiration, and enforce change. Hit Ok and we have our SQL user.

Add SQL user to membership database
Now, navigate to the database we created for our membership earlier (ConlosoDevFBA), and expand to Security-> Users. Right-click on Users and select New User….

Enter the name, select Login name, and give this fella the role “db_owner”.
To recap:
We created a database called ConlosoDevFBA.
We created a SQL user called FormsAuthUser
We added FormsAuthUser to ASPNetFormsAuth database and gave them the db_owner role.
We’re done with SQL.
2. Configure Central Admin Web Site to use SQL Membership Provider
SharePoint web sites out of the box are configured to use Active Directory. So you may be wondering why we’re configuring Central Admin to use FBA when we don’t really want to login in as an FBA user. Well, we actually don’t want to configure it to to login as a forms user, but we do need to be able to add users from out membership database when configuring site collection admins, and the like.
So all we want to do is tell the Central Admin web application to use our SQL membership provider as well as AD, so when you use the people picker to select users, it will provide results from our membership database.
Open IIS Manager on the WFE server (if more than one, then this needs to be done on every FWE that has Central Admin. The same goes for the proceeding steps for the other web applications).
Select the SharePoint Central Administration v4 site. On the Home Page, you’ll see many options for ASP.NET and IIS. The ones we’re concerned with are

Open the Connection Strings Page. Under Actions menu on the right, select Add… to create a new connection string. Provide the details for the membership database for the new connection string.

Add Role Provider
Go back to the Web Application page and open up Providers page. Here we will create a provider for Roles and Users. Set feature to .NET Roles and click Add… in the Actions pane to add a new role provider. I called it FBARoleProvider and selected the right type and connection string.
Ensure you provide an ApplicationName so the provider knows what uses to authenticate. For a good explanation on why you need this, see Scott Guthrie’s blog.

Add Membership Provider
Now set feature to .NET Users and click Add… from the actions pane to add a membership provider.

Select the correct type and connection string, and whatever behaviors you choose.
That’s it for the providers for Central Admin.
To verify that all looks ok, we can check the web.config of the web application. To get to the right web.config, right-click on the web application under sites, and select Explore.

In the web.config, you’ll see sections for the connection string and the providers. The <roleManager> and <membership> sections should look like:

You should also see a <connectionStrings> section close to the bottom of the web.config file.
3. Configure Secure Store Web Service to use SQL Membership Provider
Everything we did for Central Admin site, we are going to do for the SecurityTokenServiceAppliaation which is in the SharePoint Web Services application.

Without redo’ing all the steps:
- Create the connection string
- Add the .NET role provider
- Add the .NET users provider
- Verify connection by editing config.xml.
4. Create Extranet Web Application
Ok, finally we are ready to create our web application (called SharePoint – FBA) that will use FBA authentication.
In Central Admin, Select the Application Management page, and select Manage web applications. Select New from the ribbon to create a new web application.
Select Claims Based Mode Authentication as Authentication Type. Select values for all the other options until you get to the “Enable Forms Based Authentication”.
Add the values we created earlier in the section “Enable Forms Based Authentication” for role and membership provider.

Once the application is created, we should create a site collection.
Create Site Collection
Go to the Create Site Collection page from the Manage Applications section in Central Admin. Select the team (or blank, or whichever you choose) template then select the site collection administrator. At this point, we should be able to select from our SQL membership users. Enter a user you know exists in the membership database and see if you can resolve the names.

I have a user with the same name in both AD and SQL, so I know I am hitting both.
Note: I jumped ahead here and added users through IIS Manager. If you have been following this article to the letter, then you will obviously not see users in your membership database. Do not worry about this piece for now, as you will add users to your membership store later.
At this point we have told SharePoint what role providers to use for the web app, but we still need to configure the web app through IIS manager to bind the providers.
Configure Membership Providers for Web App through IIS
In IIS Manager, browse to the new site SharePoint – FBA. For our new FBA site we need to do the following:
- Add connection string
- Add Providers for members and roles
- Configure .NET Roles
- Configure .NET Users
- Set Authentication to Forms and Integrated
- Add User as Site Collection Admin

1. Add Connection String
Same as we have done before.

Note: we could potentially just do this for the machine, and not have to do it for every web application. I prefer to do it for every web app, as I’ve had mixed results otherwise.
2. Add role and user providers
Again, same as what we did before. Open Providers page and add an entry for our role and user providers.


3. Configure .NET Roles
This and the next steps are not required for the other two web applications we configured (Central Admin and SSS).
Open the .NET Roles page for our web application. You will receive a warning that the default role provider is not trusted. WE just need to set our default role provider to FBARoleProvider.

We do not have any roles in our database at this point, so let’s create two (StandardUser, SuperUser) by clicking Add… in the actions pane.

4. Configure .NET Users
Now we need to do the same for .NET Users. Open the .NET Users page. You will get a similar warning saying the default is not trusted. Set the default provider to FBAMembershipProvider. If you had members in the database, you would now see them listed. Assuming you don’t let’s add some. Click Add… from the Actions pane to add users, and assign them roles.


5. Set Authentication
SharePoint should have done this when you created the web application, but let’s confirm. From the web application home page in IIS Manager, select Authentication under the IIS section. Confirm that the web application has both Integrated and Forms enabled.
6. Add User as Site Collection Admin
Now that we have everything hopefully configured correctly, we can go back to SharePoint Central Admin and add our new user as the Site Collection Administrator. From Central Admin Application Management page, click Change site collection administrators. Select SharePoint – FBA root site collection, and add our new user.

Now lets test all this business by trying to login. Browse to your site and select to login as a forms user.

What the…?! I am authenticated ok, but am not allowed in, even though I’m a site collection admin?!
Caveat
Here’s the caveat – In order for you to use IIS Manager to manage your SQL users, you need to set the default provider to our Forms provider, i.e. FBAMembershipProvider. In order for it to work we need to set it to the SharePoint claims provider. Go back to .NET Users and reset the default provider to “i” which is for the Microsoft.SharePoint.Administration.Claims.SPClaimsAuthMembershipProvider

You could work around this by creating another IIS web site, configure the same way you did for SharePoint – FBA, and use that for managing users.
You should also check the default Role Provider for the web application and ensure that is set to “c”. If this is set to the SQL provider that you created, you will get an unexpected error after you logon.
Now let’s try to login again…

Success!!
To verify all of the above: here are the three web.config files in play:
Central Admin Web.config
<roleManager>
<providers>
<add name="FBARoleProvider" type="System.Web.Security.SqlRoleProvider, System.Web,
Version=2.0.0.0, Culture=neutral, PublicKeyToken=b03f5f7f11d50a3a" applicationName="/"
connectionStringName="FBADB" />
</providers>
</roleManager>
<membership>
<providers>
<add name="FBAMembershipProvider" type="System.Web.Security.SqlMembershipProvider,
System.Web, Version=2.0.0.0, Culture=neutral, PublicKeyToken=b03f5f7f11d50a3a"
applicationName="/" connectionStringName="FBADB" enablePasswordReset="true"
enablePasswordRetrieval="false" passwordFormat="Clear" requiresQuestionAndAnswer="false"
requiresUniqueEmail="false" />
</providers>
</membership>
Secure Store Web Service web.config
<membership>
<providers>
<add name="FBAMembershipProvider" type="System.Web.Security.SqlMembershipProvider, System.Web, Version=2.0.0.0, Culture=neutral, PublicKeyToken=b03f5f7f11d50a3a" applicationName="/" connectionStringName="FBADB" enablePasswordReset="true" enablePasswordRetrieval="false" passwordFormat="Clear" requiresQuestionAndAnswer="false" requiresUniqueEmail="false" />
</providers>
/membership>
roleManager>
<providers>
<add name="FBARolePRovider" type="System.Web.Security.SqlRoleProvider, System.Web, Version=2.0.0.0, Culture=neutral, PublicKeyToken=b03f5f7f11d50a3a" applicationName="/" connectionStringName="FBADB" />
</providers>
/roleManager>
Web Application (SharePoint – FBA) web.config
<membership defaultProvider="i">
<providers>
<add name="i" type="Microsoft.SharePoint.Administration.Claims.SPClaimsAuthMembershipProvider, Microsoft.SharePoint, Version=14.0.0.0, Culture=neutral, PublicKeyToken=71e9bce111e9429c" />
<add name="FBAMembershipProvider" type="System.Web.Security.SqlMembershipProvider, System.Web, Version=2.0.0.0, Culture=neutral, PublicKeyToken=b03f5f7f11d50a3a" applicationName="/" connectionStringName="FBADB" enablePasswordReset="true" enablePasswordRetrieval="false" passwordFormat="Clear" requiresQuestionAndAnswer="false" requiresUniqueEmail="false" />
</providers>
</membership>
<roleManager cacheRolesInCookie="false" defaultProvider="FBARoleProvider" enabled="true">
<providers>
<add name="c" type="Microsoft.SharePoint.Administration.Claims.SPClaimsAuthRoleProvider, Microsoft.SharePoint, Version=14.0.0.0, Culture=neutral, PublicKeyToken=71e9bce111e9429c" />
<add name="FBARoleProvider" type="System.Web.Security.SqlRoleProvider, System.Web, Version=2.0.0.0, Culture=neutral, PublicKeyToken=b03f5f7f11d50a3a" applicationName="/" connectionStringName="FBADB" />
</providers>
</roleManager>


